Few plumbing issues are as baffling as a kitchen appliance that works perfectly during normal, everyday use but fails catastrophically the moment you fill the sink basin. If you can run your faucet indefinitely without a single drop escaping, yet discover a steady stream of water under your cabinet whenever you soak pots and pans, you are dealing with a highly specific hydrostatic pressure failure.
When a garbage disposal leaking scenario only presents itself under a full load of standing water, it tells you that the structural seals are intact against moving water, but completely fail when subjected to the weight and pressure of a filled basin.
The Hidden Physics: Hydrostatic Pressure Explained
To understand why a full sink triggers a leak that normal rinsing does not, you have to look at how water weight changes inside the drain system.
When you run a kitchen faucet normally, water flows across the sink floor, enters the disposal chamber, and immediately exits through the black discharge pipe via gravity. The water is moving fast and exerts almost zero outward physical pressure on the internal components.
However, when you pop the sink stopper in and fill the basin with several gallons of water, the dynamic changes completely.
[Filled Sink Basin]  <── High Hydrostatic Pressure (Heavy Water Weight)
       │
       ▼
[Sink Flange Seal]   <── Primary Failure Point (Putty or Silicone fails under weight)
       │
       ▼
[Disposal Body]      <── Secondary Failure Point (Internal seals/cracked housing weep)
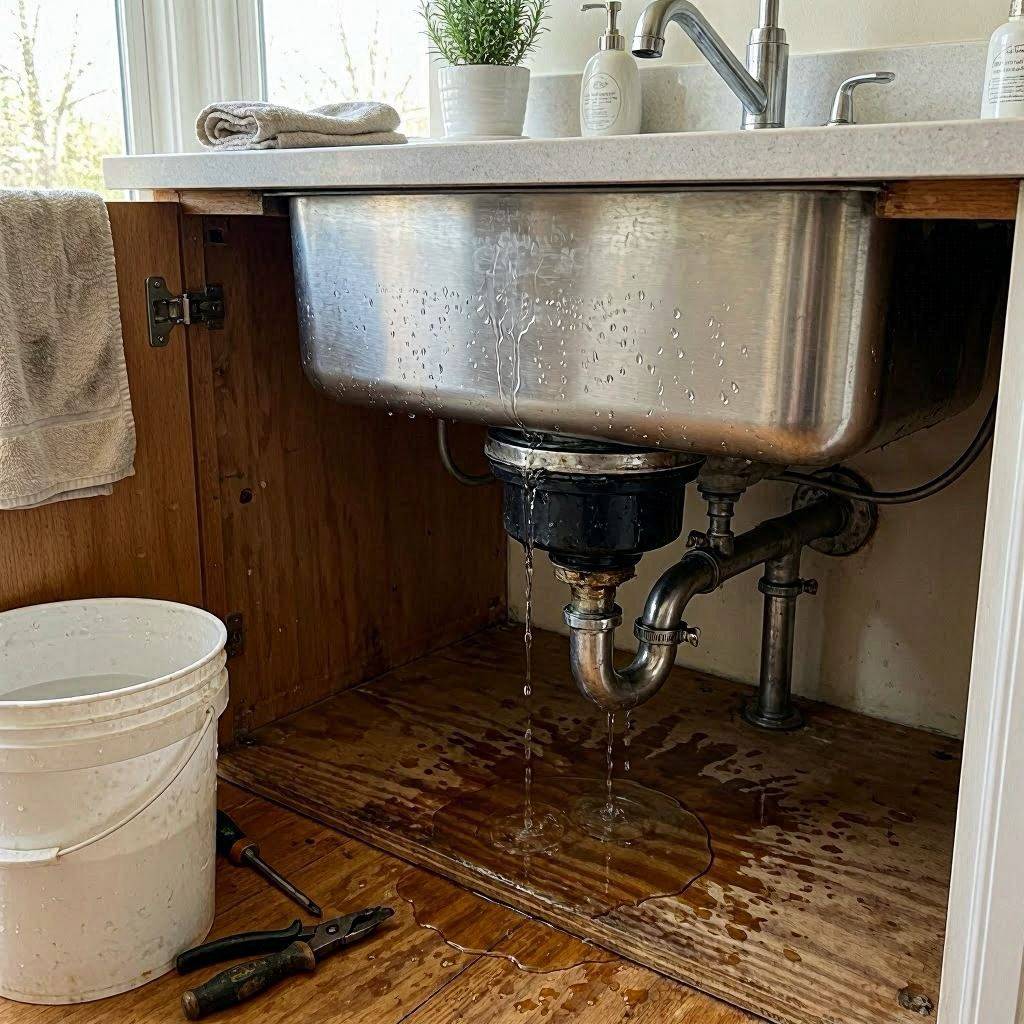
Every gallon of standing water weighs roughly 8.34 pounds. If your sink holds 5 gallons of water, you have over 40 pounds of continuous downward force pressing directly onto the sink flange, the mounting rings, and the internal gaskets of your disposal. This weight creates hydrostatic pressure.
The 3 Most Common Failure Points Under Heavy Water Loads
When a garbage disposal leaking issue is tied directly to a filled sink basin, the culprit is almost always located in one of three specific zones:
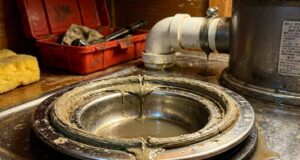
1. The Upper Sink Flange Seal (The Most Likely Culprit)
The sink flange is the metal collar that sits inside the drain hole at the bottom of your sink bowl. It is sealed to the sink surface using a thick ring of plumber’s putty or silicone. Over five to ten years, this sealant dries out and develops tiny, invisible fissures.
When the sink is filled, the immense weight of the water flexes the sink basin slightly and forces water down through those microscopic fissures. The water then travels past the cardboard backup ring and drips down the exterior shell of the disposal unit.
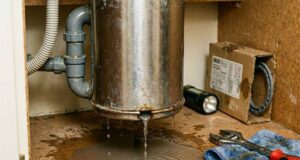
2. A Failing Internal Main Shaft Seal
Inside the machine, directly beneath the spinning shredder plate, sits a heavy-duty rubber or carbon shaft seal. Its job is to keep water from entering the electric motor housing below.
When a sink is filled with water, the disposal chamber is completely flooded and pressurized by the water column above it. If the internal shaft seal is old, brittle, or worn thin, this standing pressure easily pushes water past the rubber lip, causing it to drip out through the very bottom of the unit, often near the red reset button.
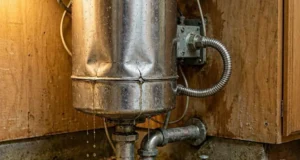
3. Stress Fractures in the Outer Plastic Shell
Lower-tier garbage disposals often feature outer housings made of high-impact plastics or composite polymers. Over years of handling intense motor vibrations and rapid temperature swings (hot pasta water followed by ice), these plastics become brittle.
Under the heavy weight of a full sink, the outer casing experiences structural stress, causing hairline cracks along the seams or near the mounting tabs to open up and weep water.
Step-by-Step Diagnostic Plan: Locating the Pressure Leak
Because water tracks downward along the paths of least resistance, you must systematically isolate the leak to avoid replacing parts that are still functional.
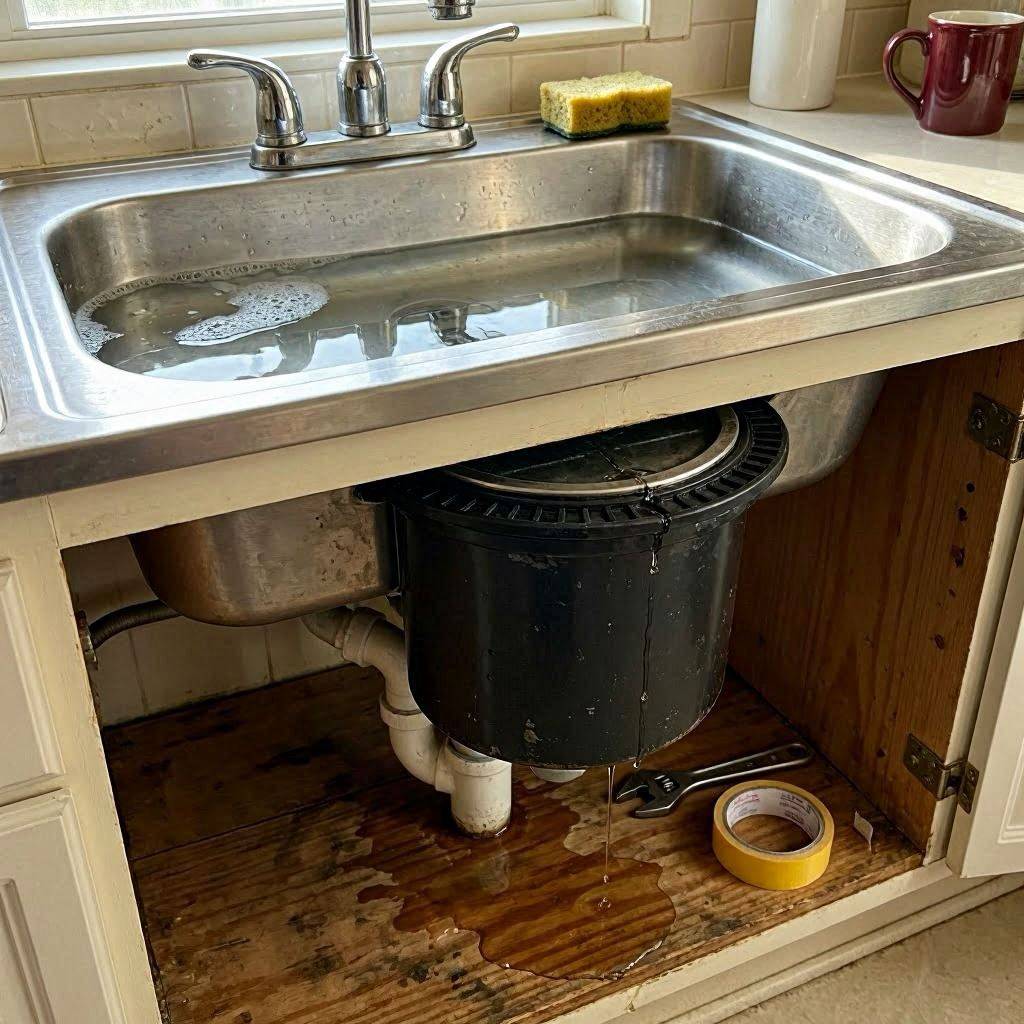
1. The Dry Paper Towel Isolation Test
- Disconnect the electrical power completely by pulling the plug from the under-sink outlet.
- Take a clean microfiber cloth and wipe down every single inch of your disposal, the side drain pipes, and the upper mounting rings until they are bone dry.
- Wrap a single sheet of dry paper towel around the very top neck of the disposal (just below the sink floor) and secure it with a rubber band. Place another dry paper towel on the floor of the cabinet directly beneath the center of the unit.
- Insert the sink stopper and fill the basin halfway with warm water. Let it sit completely still for 10 minutes without turning the machine on.
2. Reading the Results
- If the top paper towel is wet: Your problem is 100% located at the sink flange seal or the primary mounting hardware. The sealant has failed under pressure.
- If the top paper towel is dry, but the bottom towel is soaked: Water is bypassing the internal components or leaking through structural body cracks. Your appliance has suffered an internal mechanical failure.
How to Fix the Problem Based on Your Diagnosis
Scenario A: Resealing a Failed Top Sink Flange
If your diagnostic test pointed directly to the top ring, you can easily repair this yourself using fresh plumber’s putty (for stainless steel sinks) or 100% silicone sealant (for granite or composite sinks).
1.Support and Release the Heavy Unit:10 Minutes.
Place a small scissor jack, a bucket, or a stack of sturdy books directly beneath the disposal body to absorb its weight. Insert a large screwdriver into one of the metal loops on the lower mounting ring and rotate it counterclockwise. This unlocks the unit from the flange assembly, allowing you to lower it safely out of the way.
2.Disassemble the Mounting Hardware:15 Minutes.
Loosen the three long compression screws on the metal backup ring. Once the tension is gone, use a flathead screwdriver to pry off the circular metal snap ring from the flange neck. Slide the mounting rings and the thick triangular fiber gasket down and off the assembly.
3.Extract the Flange and Deep Clean the Drain Ring:15 Minutes.
Go above the sink and pull the metal flange straight up out of the drain hole. Use a plastic putty knife to scrape away every single speck of old, crusty sealant from the sink basin and the flange rim. Clean the surfaces with rubbing alcohol until they are perfectly smooth; new putty will not adhere to old oily residue.
4.Apply Fresh Putty and Re-Compress the Sandwich:15 Minutes.
Roll a piece of fresh plumber’s putty between your palms to create a consistent rope roughly 1/2-inch thick. Press this rope around the underside edge of the clean metal flange. Drop the flange back into the sink opening and press down firmly. From underneath, reinstall the fiber gasket, mounting rings, and snap ring. Tighten the three mounting screws evenly, a few turns at a time, to create perfectly balanced compression under the sink floor.
Scenario B: Resolving Internal Failures or Casing Cracks
If your paper towel test confirmed that the standing water pressure is forcing drops out of the internal motor housing or through visible cracks in the plastic shell, the realistic solution is a complete appliance replacement.
Internal shaft seals are factory-pressed assemblies and are not sold as consumer-replaceable spare parts. Furthermore, once water sits inside the electrical motor windings under hydrostatic pressure, the internal insulation is compromised, creating a permanent shock hazard.
Proactive Habits to Protect Your Seals from Pressure Blowouts
Once your sink is completely leak-free, you can extend the life of your plumbing setup by adopting these preventative strategies:
- Avoid Over-Filling for Extended Periods: Try not to leave your sink filled to the absolute brim with heavy standing water overnight. If you need to soak heavy pans, soak them individually inside the pan itself rather than filling the entire sink basin, reducing the continuous load on your plumbing seals.
- Stop Using Chemical Drain Gels: If your sink drains slowly when filled, never dump thick chemical acid cleaners into the standing water. The weight of the water holds that caustic chemical solution directly inside the disposal chamber, where it aggressively eats away at your rubber gaskets and plastic casing.
- Perform a Biannual Screw Check: Put a reminder on your calendar every six months to peer under the sink and ensure the three mounting screws remain tight. Keeping the compression perfectly uniform ensures the flange seal can withstand heavy water weight without flexing or leaking.