A kitchen sink is the functional heart of any home, handling everything from daily meal prep to heavy cleanups. When a persistent puddle forms inside your under-sink cabinetry, it immediately disrupts your routine. If your diagnostic checks reveal that water is oozing from the top joint where the appliance meets the bottom of the sink basin, you are dealing with a classic garbage disposal leaking scenario caused by a failed structural seal.
Over years of constant duty, the watertight barrier beneath the metallic drain collar degrades. When this happens, gravity pushes waste water past the boundary lines of your drain hole, threatening your wooden cabinetry with rot, warping, and mold.
Resealing the sink flange is a highly approachable DIY plumbing project. By addressing a garbage disposal leaking issue at the flange early, you can avoid a costly emergency plumber bill and keep your existing appliance running perfectly for years.
Why the Sink Flange Seal Fails
To fix the issue permanently, it helps to understand why the original seal broke down in the first place. The connection relies on a physical “sandwich” of components compressed tightly together:
[Sink Basin Basin] ──> Plumber's Putty Ring (Watertight Barrier)
   └── [Metal Sink Flange]
      └── [Under-Sink Fiber Gasket]
         └── [Three-Bolt Mounting Ring Assembly]
This assembly holds the entire weight of the heavy motorized unit. The seal typically fails due to three main factors:
1. Hardening and Decomposition of Old Plumber’s Putty
Traditional plumber’s putty is an oil-based compounding clay. While it provides an excellent seal initially, decades of exposure to boiling water, chemical dish soaps, and degreasing agents slowly leach the oils out of the compound. The putty becomes brittle, cracks, and eventually crumbles away, leaving open pathways for water to escape.
2. High-Frequency Vibrational Fatigue
Garbage disposals operate at high speeds, creating significant internal torque and continuous micro-vibrations when grinding tough food waste. Over time, these persistent physical movements can back off the three primary mounting screws or slightly shift the alignment of the flange, breaking the delicate adhesive bond of the sealant.
3. Structural Shifts and Impact Strain
Slamming heavy iron skillets into the sink basin or accidentally shoving a massive plastic trash bin against the disposal body under the cabinet can create sudden physical shocks. These impacts can break a brittle putty seal instantly, leading to an immediate drip.
Pre-Requisites: Choosing the Right Sealant Material
Before you begin the disassembly process, you must verify what material your kitchen sink is made of, as this dictates the type of sealant you should use:
- Stainless Steel Sinks: Traditional Plumber’s Putty is the ideal choice. It is easy to manipulate, creates an instant mechanical seal, and allows for straightforward cleanup.
- Granite, Quartz, or Composite Sinks: Use 100% Plumbing-Grade Silicone Sealant. Traditional plumber’s putty contains mineral oils that can permanently seep into porous composite materials, leaving a permanent dark stain around your drain opening.
Step-by-Step Guide to Resealing the Flange
Required Tools and Supplies:
- Fresh Plumber’s Putty (or 100% silicone)
- Flathead and Phillips head screwdrivers
- A sturdy hex wrench or specialized mounting tool (usually included with the disposal)
- A plastic putty knife or non-scratch scrubbing pad
- Rubbing alcohol or degreasing cleaner
- An adjustable car jack, bucket, or stack of thick books
1.Isolate Power and Detach the Disposal Body:10 Minutes.
Unplug the electrical cord from the wall outlet. If your unit is hardwired, switch off the dedicated circuit breaker. Place a bucket or a car jack beneath the disposal to support its weight. Insert your screwdriver or wrench into the locking loop of the lower mounting ring. Rotate the ring counterclockwise to disengage the unit from the mounting flange. Lower the machine carefully and set it aside.
2.Remove the Mounting Ring and Gaskets:15 Minutes.
Loosen the three long mounting screws on the backup ring evenly. Once loose, use a flathead screwdriver to pry open the spring-loaded metal snap ring that sits around the flange neck. Slide the snap ring, the metal backup ring, the mounting ring, and the thick triangular fiber gasket down off the flange neck.
3.Extract the Old Flange and Deep Clean the Surfaces:15 Minutes.
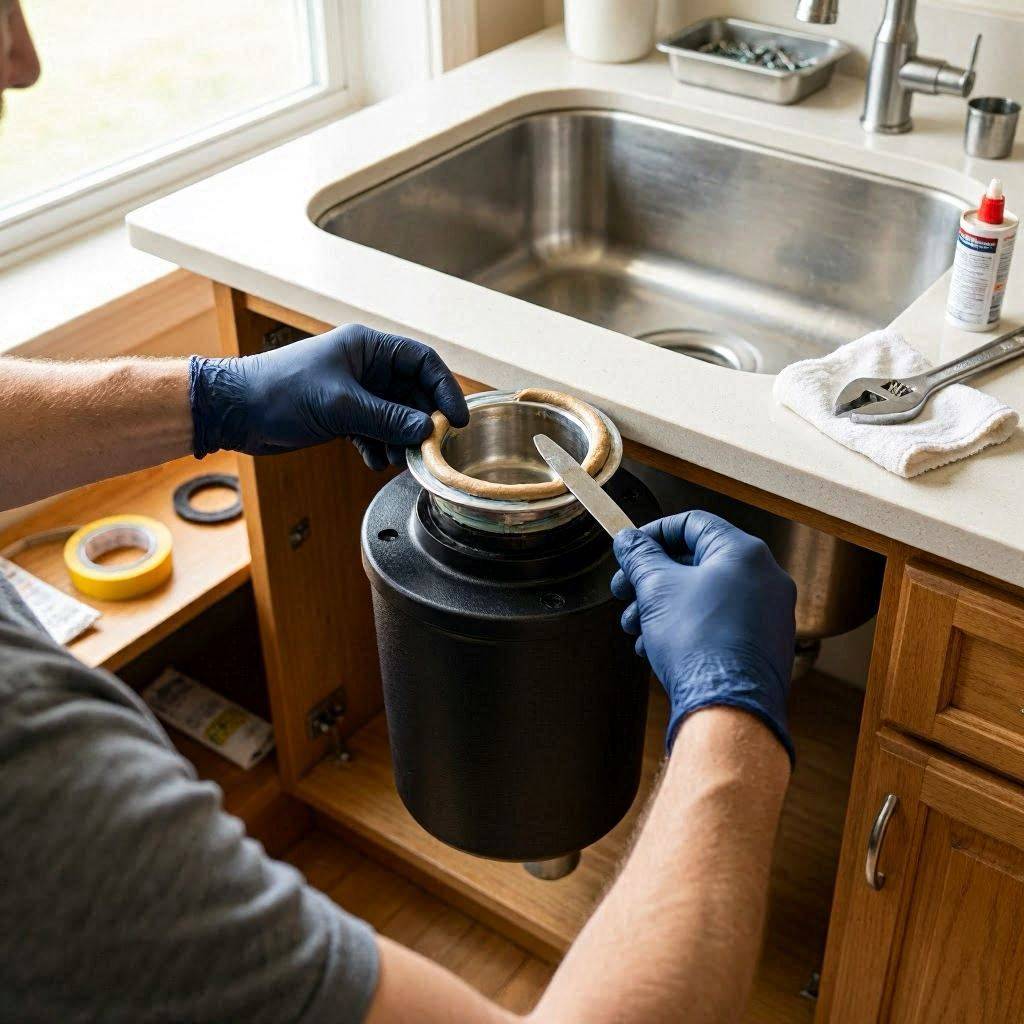
Push the metal sink flange straight up out of the drain hole from underneath, then lift it out from inside the sink bowl. Use your plastic putty knife to thoroughly scrape away all old, crusty putty from the sink basin opening and the underside of the flange. Wipe down both surfaces with rubbing alcohol and a non-scratch pad until they are completely free of grease, oil, and debris; new sealant will not bond to old residue.
4.Apply New Sealant and Press the Flange Cleanly:15 Minutes.
Take a golf-ball-sized piece of fresh plumber’s putty and roll it between your palms to form a smooth, uniform rope about 1/2-inch thick. Press this putty rope firmly onto the underside rim of the clean metal flange. Place the flange back down into the clean sink drain opening. Press down evenly with your body weight to seat it; a small amount of putty should squeeze out into the sink bowl.
5.Reassemble the Hardware and Lock the Disposal:20 Minutes.
From beneath the sink, slide the fiber gasket, backup ring, and mounting ring back over the flange neck. Snap the metal retaining ring back into its groove. Tighten the three mounting screws evenly, turning each one a few rotations at a time to maintain balanced pressure. Once secure, go above the sink and scrape away the excess squeezed-out putty. Lift your heavy disposal unit back onto the mounting assembly and twist the locking ring clockwise until it clicks into place.
Testing Your New Seal for Total Success
Do not pack your tools away until you have verified your work with a rigorous pressure test.
- The Visual Inspection: Ensure that the upper neck of the disposal is completely dry and free of any residual powder or old water spots.
- The Static Test: Plug your sink basin with a standard stopper. Fill the sink with roughly 3 to 4 inches of warm water. Let it sit completely still for 5 minutes. Take a dry piece of paper towel and wipe all around the under-sink mounting assembly to ensure there is no slow weeping.
- The Dynamic Dump Test: Pull the sink stopper out while running the disposal motor. This forces a high volume of water down the lines under vibrational stress, which is the ultimate test for a garbage disposal leaking at the top connection. If the paper towel stays dry, your repair is a success.
Proactive Care Strategies for Long-Term Durability
To maximize the life of your fresh flange seal and prevent recurring structural leaks, adopt these healthy maintenance habits:
- Avoid Over-Stuffing: Never jam large volumes of food waste down the disposal all at once. Grind small batches progressively to keep peak vibrational torque to a minimum.
- Eliminate Chemical Cleaners: Avoid pouring harsh, highly acidic drain-clearing chemicals down the sink. These corrosive fluids pool inside the drain collar, accelerating the degradation of your sealant paste and fiber gaskets.
- Annual Tightness Check: Make it a routine part of your household maintenance to inspect the under-sink area once a year. Check that the three mounting screws remain tight and that the locking ring has not shifted out of its fully engaged position.