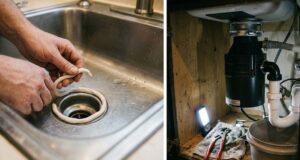
A smoothly running kitchen is the backbone of a stress-free household. From morning coffee to family dinners, we rely heavily on our kitchen appliances to keep things hygienic and efficient. Near the top of that list is the kitchen disposal—a workhorse tucked away beneath the sink that quietly grinds up organic waste and flushes it down the line.
Because it sits out of sight, it usually stays out of mind. That is, until you open the cabinet doors to grab a trash bag and step right into a puddle of stagnant, foul-smelling water.
A garbage disposal leak is more than just a minor inconvenience; it is a ticking clock for your kitchen’s infrastructure. Left alone, that quiet dripping will warp your wooden cabinetry, ruin flooring, and create a breeding ground for toxic black mold. Fortunately, managing a garbage disposal leak doesn’t always require a costly emergency plumbing bill. With a systematic approach, a few basic household tools, and the right guidance, you can pinpoint the source, resolve the issue, and safeguard your kitchen.
Anatomy of an Under-Sink Leak: Tracking the Source
You cannot fix a plumbing issue by guessing. A modern kitchen disposal is an intersection point where high-speed mechanical components, plumbing lines, wastewater, and electrical connections all meet. Because it is subjected to intense vibrations every time it runs, a garbage disposal leak can develop in a few distinct zones.
Before trying to patch anything, you need to understand the four primary trouble spots:
                  [ FRONT VIEW OF DISPOSAL UNIT ]

                       +-----------------+
                       |   Sink Drain    |
                       +--------+--------+
                                │
   1. Sink Flange Leak ──► ┌────┴────┐ ◄── 2. Dishwasher Hose Leak
   (Top Sealing Ring)      │         ├──────────────[ Hose ]
                           │         │
                           │  Unit   │
   4. Internal Motor Leak ─►         ├──────┐ ◄── 3. Discharge Pipe Leak
   (Bottom Vents/Rivets)   │         │      │     (To Wall Drain)
                           └─────────┘      ▼
- The Sink Flange (The Top): This is the metal collar that mounts the disposal directly to the sink drain opening.
- The Dishwasher Inlet (Upper Side): A small rubber tube connects your dishwasher’s drain line to the upper chamber of the disposal canister.
- The Discharge Pipe (Lower Side): This is the main PVC or ABS plastic pipe that carries the ground-up waste out of the unit and into your home’s main sewer lines.
- The Motor Housing (The Bottom): The very base of the unit, where electrical wiring enters and motor ventilation holes are located.
Step-by-Step Diagnostic Routine
Professional plumbing technicians use a simple, logical sequence to track down a elusive garbage disposal leak. You can duplicate this exact process at home without any specialized training.
Step 1: Isolate the Power
Safety is non-negotiable. Before you place your hands, tools, or face underneath a plumbing fixture, disconnect the power supply. Unplug the disposal from its under-sink wall outlet. If your unit is hardwired directly into a wall junction box, walk over to your home’s main service panel and switch off the dedicated circuit breaker.
Step 2: The Dry Out
Remove every cleaning spray, sponge, and bucket from the cabinet base. Take an old towel or microfiber cloth and wipe down the entire exterior of the disposal unit, the metal mounting rings, and every single plastic pipe connection. It must be completely dry so you can spot fresh water movement.
Step 3: Run the Isolation Test
Place a layer of dry, clean paper towels directly on the cabinet floor beneath the unit. Turn on your kitchen faucet and let a steady stream of water run down into the drain.
- Watch the top: If moisture begins to coat the upper lip of the metal canister immediately, your garbage disposal leak is at the sink flange.
- Watch the sides: If water only drops when you run the tap heavily or when the dishwasher discharges, focus on the side pipe connections.
- Watch the base: If water begins dripping out of the bottom metal rivets or electrical configuration slots, your unit’s internal mechanics have failed.
Common Fixes for a Garbage Disposal Leak
Once you have identified the precise point of failure, you can choose the appropriate repair strategy.
+------------------------+---------------------------------+-----------------------------------+
| Leak Location          | Primary Cause                   | Standard Remedy                   |
+------------------------+---------------------------------+-----------------------------------+
| Top Flange Assembly    | Vibrated loose / Dried putty    | Reseal flange with fresh putty    |
| Side Dishwasher Port   | Loose hose clamp / Split rubber | Tighten clamp or trim worn hose   |
| Side Main Discharge    | Degraded rubber gasket          | Install a fresh rubber waste seal |
| Bottom Ventilation     | Failed internal motor seal      | Replace the entire disposal unit  |
+------------------------+---------------------------------+-----------------------------------+
Resealing a Failed Sink Flange
The persistent vibration of grinding down food waste can gradually back off the three mounting screws holding the disposal assembly against the bottom of the sink. When this happens, the waterproof barrier created by the plumber’s putty breaks down.
To fix this, you must support the weight of the unit, detach it from the mounting ring, and loosen the assembly. Push the sink flange slightly upward through the drain hole from below, scrape away the old, brittle putty, and apply a fresh, generous bead of new plumber’s putty or high-grade silicone seal around the drain lip. Press it back down firmly, tighten the mounting bolts from underneath, and scrape away any excess putty that squeezes into the sink bowl.
Stopping Pipe Joint Leaks
The side discharge pipe relies on a small rubber gasket and a metal flange held tight by one or two bolts to stay watertight. If water is dripping from this joint, try tightening the bolts evenly with a screwdriver or socket wrench. If the dripping continues, remove the bolts completely, pull the pipe out, and inspect the rubber gasket. If it is cracked, dry-rotted, or flattened, replace it with a cheap new gasket from a local hardware store.
Addressing the Bottom-Casing Nightmare
If your diagnostic test reveals that water is weeping directly out of the bottom electrical housing, the internal shell seals have deteriorated. This means water is actively bypassing the barrier and entering the live electric motor chamber.
This is an unfixable safety hazard. There is no patch, putty, or sealant that can safely fix a bottom motor leak. If your unit is leaking from the very base, you must buy and install a completely new garbage disposal unit.
When to Bring in a Licensed Plumbing Professional
While swapping out a rubber gasket or tightening a loose hose clamp is an easy weekend project for a handy homeowner, certain situations call for technical expertise. Dealing with underlying plumbing lines can get complicated quickly, especially in older homes.
                         [ WHEN TO CALL A PLUMBER ]
                                     │
       ┌─────────────────────────────┼─────────────────────────────┐
       ▼                             ▼                             ▼
Galvanized Pipes             Electrical Wiring             Wall-Cavity Leaks
(Old, brittle metal lines     (Hardwired units with no     (Water seeping through
 easily crack if twisted)      simple plug-and-play)        drywall behind the sink)
Qualified plumbing professionals bring proper diagnostic tools, trade experience, and structural knowledge to your kitchen. They can evaluate your drainage network to ensure everything has the correct downward slope, which prevents food waste from backing up and putting excessive pressure on your connections. If you lack the physical strength to hold a heavy disposal unit in place while locking the mounting ring, or if you are uncomfortable dealing with high-voltage electrical lines, calling an authorized service technician is the smartest decision you can make.
Proactive Habits to Keep Your Kitchen Dry
The absolute easiest way to handle a garbage disposal leak is to prevent it from happening in the first place. Most premature appliance failures are caused by poor kitchen habits.
- Run the Cold Water: Always turn on a strong stream of cold water before you flip the disposal switch, and let it run for 15 seconds after the grinding noise stops. Cold water keeps oils and fats solid so they can be chopped up and flushed cleanly down the pipes without causing a clog.
- Stop the Grease: Never pour warm cooking oils, bacon fat, or heavy grease down your kitchen sink. Grease coats the interior of your PVC pipes, traps passing food particles, and creates massive clogs. The pressure from a severe backup can easily blow out your rubber seals, triggering a major garbage disposal leak.
- Avoid High-Fiber Scraps: Keep fibrous materials like celery, onion skins, corn husks, and coffee grounds out of the machine. These materials wrap around the internal blades, jam the impellers, and overheat the motor—destroying the internal seals that keep your cabinet dry.
By treating your disposal with care and inspecting the cabinet spaces regularly, you can maintain a clean, efficient, and leak-free kitchen for years to come.