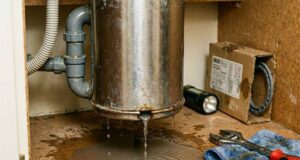
Finding water pooling under your kitchen sink can instantly ruin your day. However, unlike a fatal bottom leak that usually signals a dead motor seal, finding a garbage disposal leaking from the very top—where the unit meets the basin floor—is actually a manageable situation.
When water drips from the top sink flange, it means the physical connection separating your sink’s drain hole from the heavy appliance has lost its watertight seal.
Because this component handles every drop of water that enters your kitchen drain, a failure here can quickly warp your cabinetry and ruin your under-sink storage. This comprehensive guide details why this seal fails, how to confirm the diagnosis, and the exact process to stop the leak for good.
Understanding the Anatomy of the Top Connection
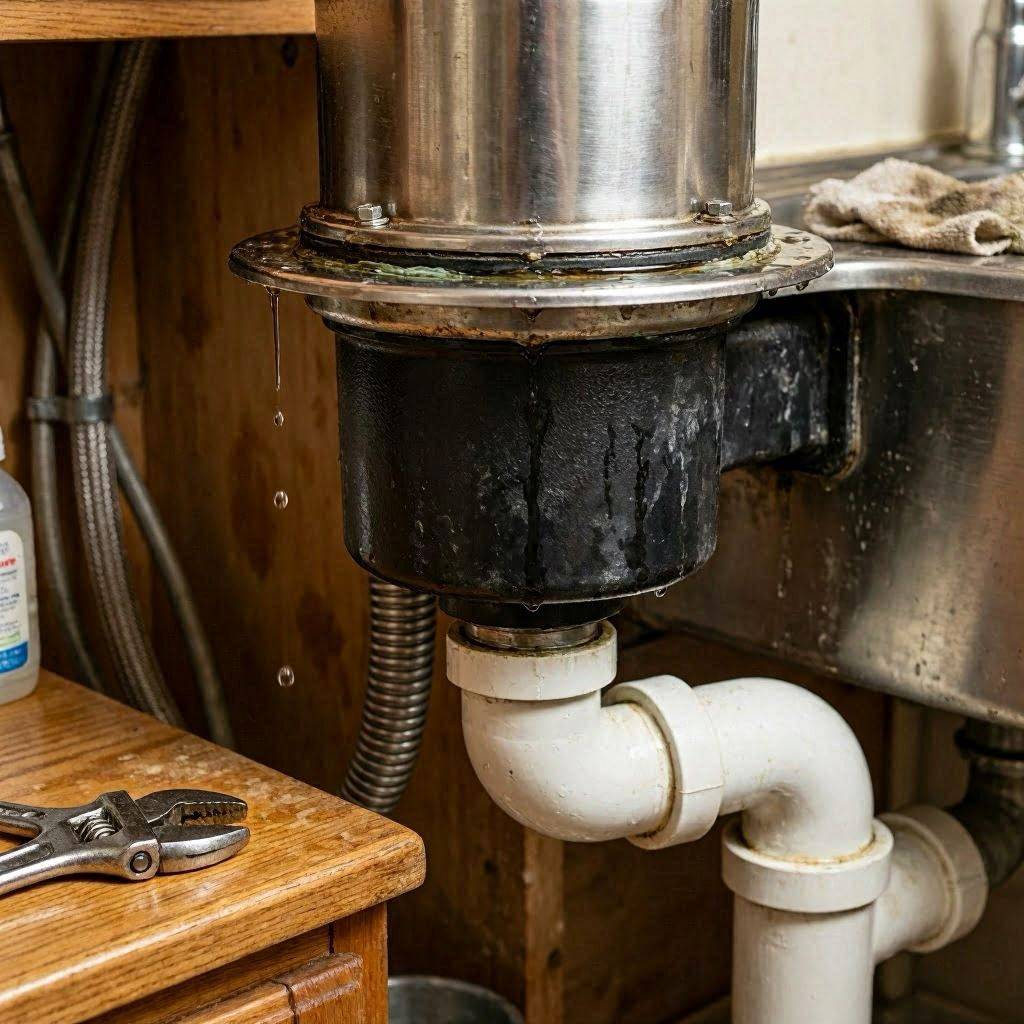
To understand why a leak happens at the top, it helps to understand how the appliance hangs under your sink. The sink flange is the visible metal collar inside the sink bowl that routes water down into the disposal.
Directly underneath the sink, a series of mounting rings, fiber gaskets, and metal screws clamp down onto this flange, pulling it tight against the sink’s underside.
[Sink Basin Floor]
 └── Plumber's Putty / Silicone Sealant (Inside the bowl)
 └── Metal Sink Flange
 └── Triangular Fiber Gasket (Underneath the sink)
 └── Backup Mounting Ring
 └── Three Mounting Screws (Provides compression)
The entire weight of the heavy disposal unit hangs from this assembly. If any part of this layered sandwich degrades, water will bypass the drain opening and drip directly down the upper neck of the unit.
The Root Causes of a Top Flange Leak
When troubleshooting a garbage disposal leaking from this upper junction, the issue almost always stems from one of four primary culprits:
1. Dried Out or Crumbled Plumber’s Putty
For decades, traditional plumber’s putty has been the industry standard for sealing the metal flange to the sink basin. Over time, constant exposure to hot water, harsh dish soaps, and chemical cleaning agents dries this compound out. Once the putty loses its flexibility, it hardens, shrinks, and develops micro-cracks that allow water to seep past the drain rim.
2. Constant Structural Vibration and Loose Screws
Garbage disposals are heavy machinery. When processing tough food waste, the high-speed spinning motor creates intense structural vibrations. Over several years, these micro-shocks act like a jackhammer on the mounting assembly, slowly backing out the three tightening screws that hold the compression ring in place. Once compression drops, the seal breaks.
3. Physical Impact and Heavy Strain
The space under a kitchen sink is often crowded with heavy trash bins, chemical jugs, and storage organizers. Accidentally slamming a heavy object into the body of the disposal while reaching into the cabinet can jar the mounting ring out of alignment. Similarly, dropping heavy cast-iron pans directly onto the drain opening from above can break the delicate sealant bond.
4. Poor Initial Installation Technique
If the mounting screws were not tightened evenly during initial installation, the flange will sit slightly tilted. This uneven pressure leaves a small gap on one side of the seal. While it might hold up for the first few months, the shifting weight of a running unit will eventually cause a slow, frustrating leak.
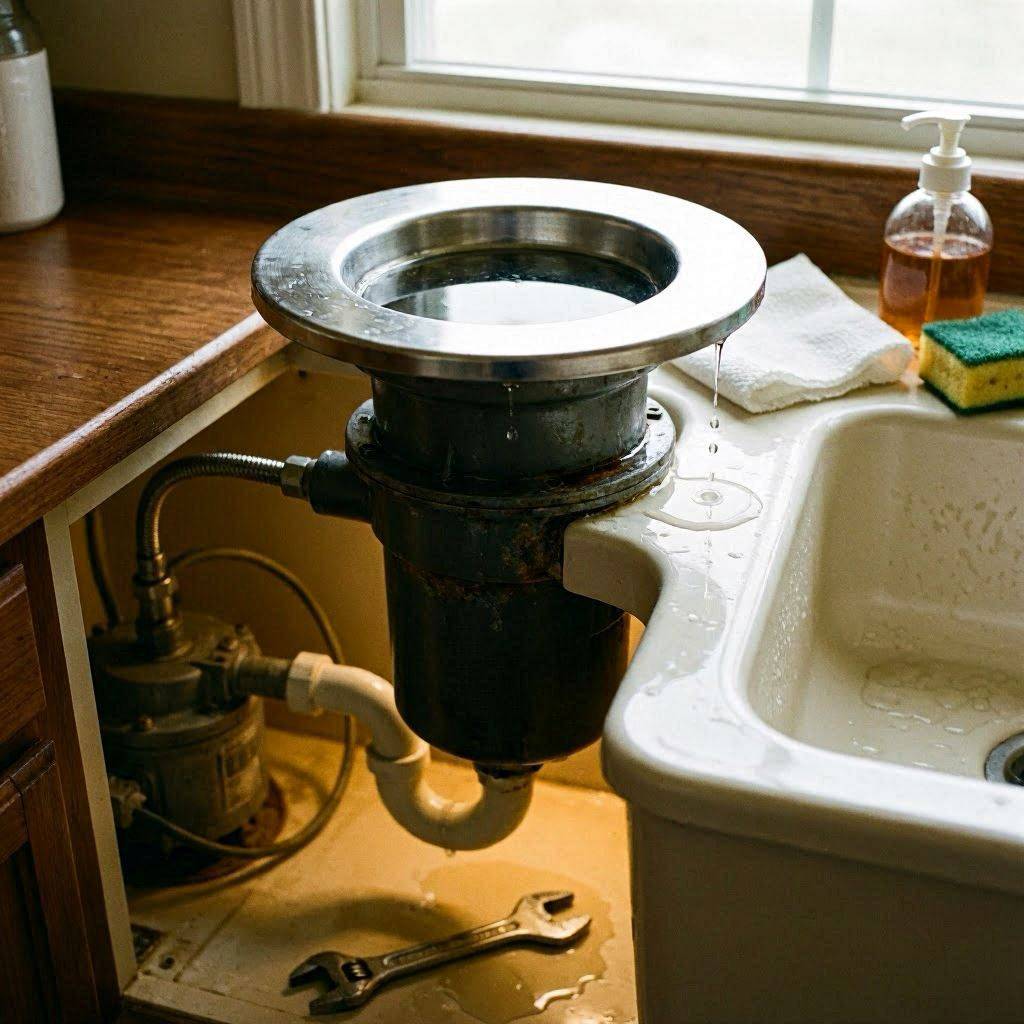
Confirming the Top Flange Leak: The Flashlight Test
Before you take your plumbing apart, you must verify that the water is originating from the top flange and not tracking down from a loose dishwasher line or a leaky faucet base.
- Dry Everything Completely: Disconnect the electrical power for safety. Use a microfiber towel to wipe down the entire sink flange assembly, the mounting rings, and the upper collar of the disposal until everything is bone dry.
- Apply the Powder Trick: Dust a light coating of baby powder or cornstarch around the top mounting rings and the upper neck of the unit.
- Run a Controlled Flow: Turn on your kitchen faucet, directing a gentle stream of water around the outer edge of the metal drain inside the sink bowl. Do not run the disposal motor.
- Inspect with a Flashlight: Peer under the sink with a bright light. If the powder turns to paste or reveals wet tracks directly beneath the sink floor before reaching the side pipes, your top flange seal has definitely failed.
Step-by-Step Guide to Re-Sealing a Leaking Sink Flange
Fixing a top flange leak is a highly rewarding DIY project that requires about an hour of your time and less than twenty dollars in materials.
Tools and Materials Required:
- Fresh Plumber’s Putty (or 100% Silicone Sealant for composite sinks)
- Flathead and Phillips screwdrivers
- Channel lock pliers or pipe wrench
- Plastic putty knife or old rag
- A small car jack, block of wood, or sturdy box to support the weight
1.Support and Unhook the Disposal Unit:10 Minutes.
Disconnect the power plug. Place a stack of books or an adjustable car jack beneath the unit to support its weight. Insert a sturdy screwdriver into one of the loops on the lower mounting ring. Turn the ring counterclockwise to unlock the disposal from the mounting assembly. Carefully lower the machine down and move your drain lines slightly out of the way.
2.Disassemble the Upper Mounting Hardware:15 Minutes.
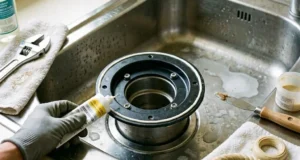
Loosen the three mounting screws on the backup ring evenly using your screwdriver. Once loose, pop off the snap ring (the spring-loaded metal ring holding everything up) using a flathead screwdriver. Remove the backup ring, the metal mounting ring, and the thick triangular fiber gasket from the sink neck.
3.Extract the Flange and Clean the Surfaces:15 Minutes.
Go above the sink and lift the old metal flange straight out of the drain hole. Use a plastic putty knife to scrape away every single trace of old, dried putty from both the stainless steel sink basin floor and the underside of the flange. Wipe both surfaces down with rubbing alcohol until they are completely smooth and clean; new putty will not adhere to old residue.
4.Apply New Putty and Re-Compress the Assembly:15 Minutes.
Grab a golf-ball-sized chunk of fresh plumber’s putty and roll it between your palms to create a consistent rope roughly 1/2-inch thick. Press this rope securely around the underside rim of the cleaned metal flange. Drop the flange back down into the sink opening, pressing down firmly with your body weight. Excess putty will squeeze out into the bowl—leave it for now.
5.Reassemble the Rings and Lock the Disposal:15 Minutes.
From underneath, place the new fiber gasket, backup ring, and mounting ring back over the flange neck. Snap the retaining ring back into its groove. Tighten the three mounting screws evenly, turning each one a few rotations at a time to ensure straight, balanced compression. Go back up top, scrape away the squeezed-out putty, re-hang your heavy disposal unit onto the mounting assembly, and lock it tight.
Important Nuance: Stainless Steel vs. Composite Sinks
If your kitchen features a modern composite quartz or granite sink rather than classic stainless steel, skip the traditional plumber’s putty. The oils present in standard plumber’s putty can permanently stain porous composite materials, creating an unsightly dark ring around your drain.
Instead, opt for 100% plumbing-grade silicone sealant. Apply a generous bead of silicone around the underside of the flange, press it into place, and allow it to cure fully according to the manufacturer’s directions before running water down the drain.
Proactive Habits to Prevent Future Flange Failures
Once your top flange is completely dry and leak-free, you can extend the life of your new seal by making a few minor adjustments to your daily routine:
- Avoid Violent Vibrations: Do not throw massive batches of rock-hard items like peach pits or thick animal bones down the disposal all at once. The violent shaking will quickly loosen the mounting screws. Drop debris in gradually.
- Keep Under-Sink Storage Clear: Arrange your cleaning products so they do not press against or knock into the disposal body when you open and close your cabinet doors.
- Check the Screws Annually: Make it a habit during your spring cleaning to look under the sink, grab a screwdriver, and ensure the three mounting screws remain tight and secure against the mounting ring.